




- Email[email protected]
- Phone+962 797 166 177
- Birthday1982-09-25
- LocationAmman, Jordan
Next-Level Smart Home Security: Setting Up Frigate NVR & Home Assistant Occupancy
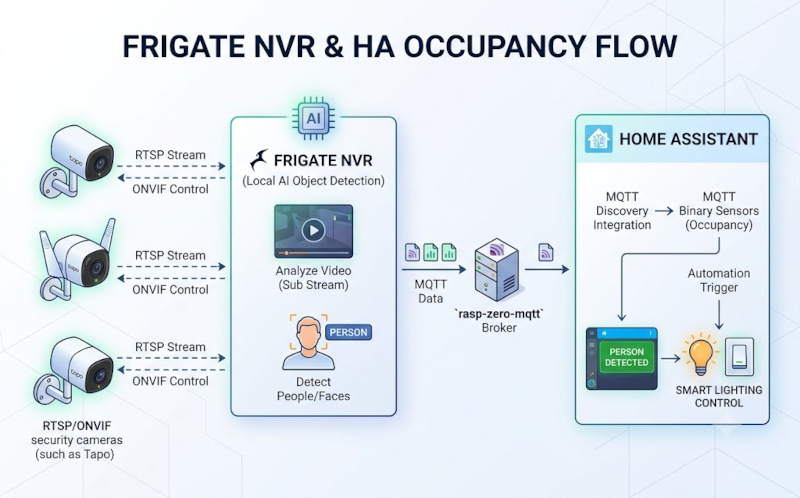
G'day mates! Welcome back to the lab. Over the past few weeks, we've built a rock-solid foundation for our smart home, from deploying a bulletproof MQTT broker on a Raspberry Pi Zero to setting up room presence detection. Today, we are taking things to the absolute next level by giving our home lab the gift of sight.
We are ditching clunky, cloud-reliant security camera apps and setting up Frigate, a bloody ripper of an open-source NVR (Network Video Recorder) built specifically for local AI object detection. By tying this into our Home Assistant setup via MQTT, we can transform standard camera feeds into hyper-accurate room occupancy sensors.
Let's crack into the terminal and get this sorted!
Why Frigate?
Frigate isn't just a standard video recorder; it actively analyzes your RTSP camera streams locally to detect people, faces, and objects. The beauty of this system is that it:
-
Processes Locally: No video is sent to the cloud, ensuring total privacy.
-
Creates Occupancy Sensors: When Frigate detects a person, it instantly fires an MQTT payload to Home Assistant, acting as a real-time occupancy sensor to trigger your lighting and automations.
-
Restreams Efficiently: Using go2rtc, it takes one stream from your camera and shares it across your entire network, preventing your cameras from crashing under multiple connections.
Step 1: The Docker Compose Setup
We are going to deploy Frigate via Docker. If you are running this on a host with a solid SSD and some hardware acceleration (like an Intel QuickSync GPU), you'll see incredible performance.
One crucial detail here: video processing writes a lot of temporary cache data. To prevent burning out your drive, we use a tmpfs volume to store this cache directly in the system's RAM.
Create your docker-compose.yaml file:
YAML
services:
frigate:
container_name: frigate
privileged: true
restart: unless-stopped
image: ghcr.io/blakeblackshear/frigate:stable
shm_size: "512mb"
dns:
- 8.8.8.8
- 1.1.1.1
devices:
- /dev/video0:/dev/video0 # Pass the camera
- /dev/dri/renderD128 # For hardware acceleration
volumes:
- /etc/localtime:/etc/localtime:ro
- /home/your_username/frigate/config:/config
- /home/your_username/frigate/storage:/media/frigate
- type: tmpfs # Uses RAM for cache to save your SD card
target: /tmp/cache
tmpfs:
size: 1000000000
ports:
- "5000:5000"
- "8554:8554" # RTSP stream port
Step 2: Configuring Frigate & Compatible Cameras
Next, we need to build our frigate.yml configuration file.
For this setup, we are using Tapo cameras (which are fantastic, budget-friendly RTSP shooters). Frigate works best when you feed it a high-res stream for recording (Main Stream) and a lower-res stream for AI detection (Sub Stream).
Notice how we are hooking this directly into the rasp-zero-mqtt broker we built in a previous project! (Note: Make sure to swap out your_username and your_password with your actual credentials).
YAML
auth:
enabled: false
mqtt:
enabled: true
host: 192.168.3.180
port: 1883
user: rasp-zero-mqtt
password: your_password
# Global Face Recognition Settings
face_recognition:
enabled: true
model_size: small
min_faces: 1
recognition_threshold: 0.9
ffmpeg:
hwaccel_args: preset-vaapi
go2rtc:
streams:
# BR CAM
tapo_br_main:
- ffmpeg:rtsp://your_username:[email protected]:554/stream1#video=copy#audio=aac
tapo_br_sub:
- rtsp://your_username:[email protected]:554/stream2
# F2 CAM
tapo_f2_main:
# 4K Stream
- ffmpeg:rtsp://your_username:[email protected]:554/stream1#video=copy#audio=aac
tapo_f2_sub:
# 720p Stream
- rtsp://your_username:[email protected]:554/stream2
# LR CAM
tapo_lr_main:
# 4K Stream
- ffmpeg:rtsp://your_username:[email protected]:554/stream1#video=copy#audio=aac
tapo_lr_sub:
# 720p Stream
- rtsp://your_username:[email protected]:554/stream2
Step 3: Defining the Cameras and ONVIF
Now that go2rtc is actively pulling the streams, we tell Frigate how to use them. We will assign the high-res streams to the record role and the low-res streams to the detect role.
We also configure ONVIF for the Tapo cameras, which allows Frigate (and Home Assistant) to natively support Pan/Tilt/Zoom (PTZ) controls!
YAML
cameras:
# BR CAM
br_cam:
ffmpeg:
inputs:
- path: rtsp://127.0.0.1:8554/tapo_br_main
input_args: preset-rtsp-restream
roles:
- record
- path: rtsp://127.0.0.1:8554/tapo_br_sub
input_args: preset-rtsp-restream
roles:
- detect
onvif:
host: 192.168.3.145
port: 2020
user: your_username
password: your_password
# F2 CAM
f2_cam:
ffmpeg:
inputs:
- path: rtsp://127.0.0.1:8554/tapo_f2_main
input_args: preset-rtsp-restream
roles:
- record
- path: rtsp://127.0.0.1:8554/tapo_f2_sub
input_args: preset-rtsp-restream
roles:
- detect
onvif:
host: 192.168.3.25
port: 2020
user: your_username
password: your_password
# LR CAM
lr_cam:
ffmpeg:
inputs:
- path: rtsp://127.0.0.1:8554/tapo_lr_main
input_args: preset-rtsp-restream
roles:
- record
- path: rtsp://127.0.0.1:8554/tapo_lr_sub
input_args: preset-rtsp-restream
roles:
- detect
onvif:
host: 192.168.3.217
port: 2020
user: your_username
password: your_password
Step 4: The Home Assistant Occupancy Magic
Once you run sudo docker compose up -d and Frigate boots up, the real magic happens over at Home Assistant.
Because we linked Frigate to our MQTT broker, Home Assistant will automatically discover your cameras. Simply head to the Frigate Integration in Home Assistant and add it.
Instantly, you'll see new binary_sensor entities created for every single camera (e.g., binary_sensor.lr_cam_person_occupancy).
Unlike dumb motion sensors that trigger when the wind blows the curtains, these occupancy sensors only trigger when the AI confirms a human is in the frame. You can now use these sensors to flawlessly turn on the living room lights when someone walks in, or send a rich notification to your phone if someone is detected at the front door while you are connected via Tailscale.
Enjoy the build, and let me know how your AI detection performs in the comments! Cheers!
"If you've got any questions or need a hand wrangling your own setup, don't hesitate to reach out at [email protected] or connect with me via www.yazan.me. I'm always keen to help out!"