




- Email[email protected]
- Phone+962 797 166 177
- Birthday1982-09-25
- LocationAmman, Jordan
Bite-Sized Security: Hooking up an ESP32-CAM to Frigate NVR via ESPHome
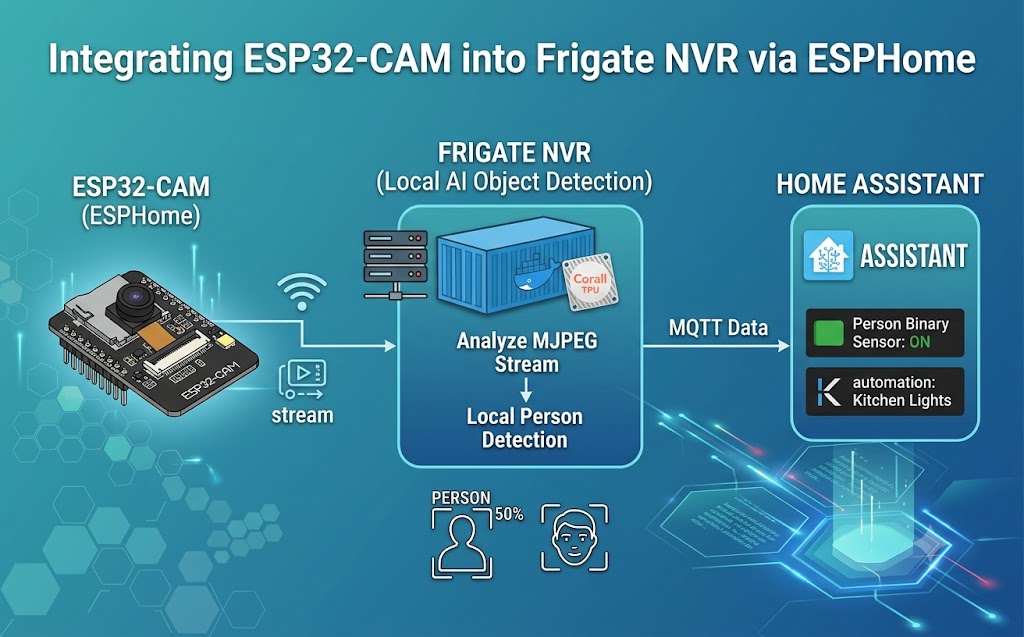
G'day mates! Welcome back to the lab. A few projects ago, we dove into the incredible world of local AI object detection by setting up Frigate NVR with our high-resolution RTSP security cameras. But what if you need to keep an eye on a tight space, like monitoring a 3D printer enclosure, the inside of your garage, or a sneaky corner of the kitchen?
Instead of dropping a ton of cash on another bulky commercial camera, we can use the legendary, dirt-cheap ESP32-CAM.
By flashing this tiny board with ESPHome, we can host a lightweight video stream and feed it directly into our Frigate setup for localized AI presence detection. Let's crack into the YAML and get this sorted!
Step 1: The ESPHome Firmware
The ESP32-CAM can be a bit notoriously finicky with heat and Wi-Fi dropouts if you push it too hard. Since our goal is simply to feed Frigate's AI for basic detection—not to record a cinematic 4K masterpiece—we are going to lock the resolution and framerate down to keep the board running like an absolute dream.
Fire up your ESPHome dashboard, create a new device, and paste in this configuration. Notice we are spinning up a local web server on port 8080 to broadcast an MJPEG stream, and we've even mapped the onboard LED to act as a remote-controlled flashlight!
YAML
esphome:
name: esp32_cam
friendly_name: K ESP32 CAM
esp32:
board: esp32cam
framework:
type: arduino
psram:
logger:
baud_rate: 0
api:
encryption:
key: "cg9Dg3OePPBh/IhjEqdoluSt19i0XHcsg6/Qn7ozfFs="
ota:
- platform: esphome
password: "ebb3b7048101db0e1267138973aeafc6"
wifi:
networks:
- ssid: !secret wifi_ssid
password: !secret wifi_password
power_save_mode: NONE
i2c:
- id: camera_i2c
sda: GPIO26
scl: GPIO27
esp32_camera:
name: ESP32 Camera
external_clock:
pin: GPIO0
frequency: 20MHz
i2c_id: camera_i2c
data_pins: [GPIO5, GPIO18, GPIO19, GPIO21, GPIO36, GPIO39, GPIO34, GPIO35]
vsync_pin: GPIO25
href_pin: GPIO23
pixel_clock_pin: GPIO22
power_down_pin: GPIO32
# Keep resolution and framerate low for stability and fast AI processing
resolution: 160x120
max_framerate: 1.0fps
jpeg_quality: 63
esp32_camera_web_server:
- port: 8080
mode: stream
switch:
- platform: gpio
pin: GPIO4
name: "K ESP32 Cam Flash"
id: camera_flash
icon: "mdi:flashlight"
Once flashed, give the board a static IP in your router (in my case, 192.168.3.52).
Step 2: Feeding the Stream into Frigate
Frigate absolutely loves standardized RTSP streams, but our ESP32-CAM is broadcasting a basic HTTP MJPEG stream. Luckily, Frigate's underlying engine (FFmpeg) is incredibly versatile.
We just need to tell Frigate exactly what kind of stream to expect by using the preset-http-mjpeg-generic input argument. We also strip out any hardware acceleration arguments (hwaccel_args: []) for this specific camera, as hardware decoders often struggle or flat-out refuse to decode MJPEG streams efficiently.
Open up your frigate.yml configuration file and add your new Kitchen (K) Cam directly under your existing cameras:
YAML
cameras:
# K CAM (Kitchen)
esp32_cam:
ffmpeg:
# Disable hardware acceleration for MJPEG to prevent decoding errors
hwaccel_args: []
inputs:
- path: http://192.168.3.52:8080/
input_args: preset-http-mjpeg-generic
roles:
- detect
Step 3: Reboot and Automate!
Restart your Frigate Docker container to apply the changes.
Within minutes, Frigate will pick up that 1fps MJPEG stream. Because the resolution is so low (160x120), your CPU or Coral TPU will process the image frames almost instantly without breaking a sweat.
Just like our major RTSP cameras, Frigate will analyze this feed and fire an MQTT payload to Home Assistant the second a person walks into the frame, turning this $5 micro-controller into an incredibly powerful, AI-driven occupancy sensor.
Enjoy the build, hide these little boards wherever you need a set of eyes, and I'll catch you in the next one! Cheers! 🍻
"If you've got any questions or need a hand wrangling your own setup, don't hesitate to reach out at [email protected] or connect with me via www.yazan.me. I'm always keen to help out!"